Showing posts with label Java. Show all posts

Wednesday, April 20, 2016

DOM vs SAX

DOM နှင့် SAX နှစ်ခုစလုံးမှာ သူဟာနှင့်သူ အားသာချက်၊ အားနည်းချက်တွေရှိပါတယ်။

DOM က document structure တစ်ခုလုံးကို memory ပေါ်တင်တဲ့အတွက်ကြောင့် document structure ကြီ:ရင် ကြီးသလောက် memory resource တွေလိုအပ်ပါတယ်။ ဒါပေမဲ့ သူက element တွေ တစ်ခုနှင့်တစ်ခုကြားမှာ အလွယ်တကူသွားလာနိုင်ခြင်း၊ element content တွေကို modify (read/write) လုပ်ရတာလွယ်ကူခြင်းတို့ကြောင့် အသုံးများပါတယ်။ (ဥပမာ - application တစ်ခုရဲ့ system configure file)

SAX ကတော့ document structure တစ်ခုလုံးကို memory ပေါ်မတင်တဲ့အတွက် less-memory intensive ဘဲလိုအပ်ပါတယ်။ SAX ကိုများသောအားဖြင့် element content များတဲ့ XML document တွေကို parse လုပ်တဲ့နေရာမှာအသုံးပြုပါတယ်။ SAX parser တွေက XML document ကို modify (Read only) လုပ်မပေးနိုင်ပါဘူး။ (ဥပမာ directory data file )


DOM
SAX
Read Mode
Reads entire Document
Reads Node by Node
XML File size
Small/Medium XML File
Large XML File
Parser Type
Tree based Parser
Event based Parser
Speed
Little Slow
Faster
Read
Yes
Yes
Write
Yes
No

DOM Parser Java Example Code

 1
 2
 3
 4
 5
 6
 7
 8
 9
10
11
12
13
14
15
16
17
18
19
20
21
22
23
24
25
26
27
28
29
30
31
32
33
34
35
36
37
38
39
40
41
42
43
44
45
46
47
48
49
50
51
52
53
54
55
56
57
58
59
60
61
62
63
64
65
66
67
68
69
70
71
72
73
74
75
76
77
78
79
80
81
82
83
84
85
86
87
88
89
package XML;

import javax.xml.parsers.*;
import java.io.*;
import org.w3c.dom.*;
import org.xml.sax.*;

public class DOMparser {


 public static void main(String [] args){
  try{
   //Read File
   File xmlFile=new File("catalog.xml");
   
   //DocumentBuilderFactory
   DocumentBuilderFactory factory=DocumentBuilderFactory.newInstance();
   
   //DocumentBuilder
   DocumentBuilder builder=factory.newDocumentBuilder();
   
   //Document
   Document document=builder.parse(xmlFile);
   
   //Get Root Element
   Element rootElement=document.getDocumentElement();
   
   System.out.println("Root Elemnet :" + rootElement.getTagName());
   
   parseNode(null,rootElement);
   
   
  }catch(Exception e){
   e.printStackTrace();
  }
  
 }
 
 public static void parseNode(Element previousNode,Element visitNode){
  
  if(previousNode != null){
   System.out.println("Element "+ previousNode.getTagName() + " has element :");
  }
  System.out.println("Element Name :" + visitNode.getTagName());
  
  //List Attributes From VisitNode
  if(visitNode.hasAttributes()){
   System.out.println("-Elment " + visitNode.getTagName() +" has Attributes :");
   NamedNodeMap attributes=visitNode.getAttributes();
   
   //Extract Attributes
   for(int i=0; i<attributes.getLength(); i++){
    Attr attribute=(Attr)(attributes.item(i));
    //Print Attribute
    System.out.println("--Attribute :" + attribute.getName() + " = " + attribute.getValue());
   }
  }//End of Attributes List
   
  //Read Nested Element or Child Node
  //Get Child Node List
  NodeList nodeList=visitNode.getChildNodes();
  
  for(int i=0; i<nodeList.getLength(); i++){
   //Get Child Node
   Node node=nodeList.item(i);
   
   if(node.getNodeType()==Node.ELEMENT_NODE){
    Element element=(Element)node;
    
    //Do same Thing /Revcursive Algorithm
    parseNode(visitNode,element);
   }
   else if(node.getNodeType()==Node.TEXT_NODE){
    String str=node.getNodeValue().trim();
    if(str.length()>0){
     System.out.println("---Element Text: " + str);

    }
   }
   
  }


 }


}


SAX Parser Java Example Code


 1
 2
 3
 4
 5
 6
 7
 8
 9
10
11
12
13
14
15
16
17
18
19
20
21
22
23
24
25
26
27
28
29
30
31
32
33
34
35
36
37
38
39
40
41
42
43
44
45
46
47
48
49
50
51
52
53
54
55
56
57
58
59
60
61
62
63
64
65
66
67
68
69
70
71
72
73
74
75
76
77
78
79
80
81
82
83
84
85
86
87
88
89
90
91
package XML;

import org.xml.sax.*;
import javax.xml.parsers.*;
import org.xml.sax.helpers.*;
import java.io.*;

public class SAXParser {
 
 public static void main(String []args){
  SAXParser saxParser=new SAXParser();
  saxParser.parseDocument();
 }
 
 public void parseDocument(){
  try{
   //SAX Parser Factory
   SAXParserFactory factory=SAXParserFactory.newInstance();
   
   //SAX Parser
   SAXParser parser=factory.newSAXParser();
   
   //Handler **
   DefaultHandler handler=new CustomSAXHandler();
   //Set File to Parse and Set Handler
   parser.parse(new File("catalog.xml"), handler);
   
   
  }catch(Exception e){
   e.printStackTrace();
  }
 }
 
 private class CustomSAXHandler extends DefaultHandler {
  //Constructor
  public CustomSAXHandler(){
   
  }
  
  //Start Document
  public void startDocument() throws SAXException {
   System.out.println("Event Type : Start Document ");
  }
  
  //End Document
  public void endDocument() throws SAXException {
     System.out.println("Event Type : End Document ");
  }
    
  //Start Element
  public void startElement (String uri,String localName,String qName,Attributes attributes){
   System.out.println("Event Type: Start Element");
   System.out.println("Element Name:" + qName);
   for (int i = 0; i < attributes.getLength(); i++) {
   System.out.println("Attribute Name:" + attributes.getQName(i));
   System.out.println("Attribute Value:" + attributes.getValue(i));
   }
  }
  
  //End Element
  public void endElement(String uri, String localName, String qName)
    throws SAXException {
    System.out.println("Event Type: End Element");
  }
  
  //Get Text
  public void characters(char[] ch, int start, int length)
    throws SAXException {
    System.out.println("Event Type: Text");
    String str = (new String(ch, start, length));
    System.out.println(str);
  }
  
  //Error
  public void error(SAXParseException e)
    throws SAXException{
    System.out.println("Error "+e.getMessage());
  }
  public void fatalError(SAXParseException e)
    throws SAXException{
    System.out.println("Fatal Error "+e.getMessage());
  }
  public void warning(SAXParseException e)
    throws SAXException{
    System.out.println("Warning "+e.getMessage());
  }


 }

}

Wednesday, April 6, 2016

Understanding JVM

JVM လို့ေျပာတာနဲ Java developers ေတာ္ေတာ္မ်ားမ်ား ရင္းႏွီးျပီးသားျဖစ္မွာပါ။ Java app ကို run ေတာ့မယ္ဆိုရင္ အရင္ဆံုး class file ေျပာင္း၊ ျပီးရင္ bytecode ထုတ္တာျပီး  JRE ထဲမွာ execute  လုပ္လိုက္တာဘဲျဖစ္ပါတယ္။ JRE ထဲမွာဘာေတြပါဘညး္၊ ဘယ္လိုအလုပ္လုပ္ လည္းဆိုတာ သိထားဖို့လိုပါတယ္။

JRE ဆိုတာ Java API ေတြရယ္ JVM ရယ္ေပါင္းစပ္ထားတဲ့ package တစ္ခုပါဘဲ။ JRE ရဲံအဓိက component ကေတာ့ JVM (Java Virtual Machine) ဘဲျဖစ္ပါတယ္။
Virtual Machine ေတြရဲ့သေဘာ သဘာ၀အရ သူတို့က software implementation ေတြျဖစ္ျပီးေတာ့၊ program ေတြကို တကယ့္ physical machine ေပါမွာတင္ run ေနရသလိုမ်ိဳးလုပ္ေဆာင္ေပးပါတယ္။ Java က platform independence ဘာေၾကာင့္ျဖစ္တာလည္းဆိုရင္ JVM ေၾကာင့္ျဖစ္တာပါ။ Java ကိုစတင္ create လုပ္ကတည္းက WORA (Write once, Run Anywhere) ျဖစ္ဖို့အတြက္ရည္ရြယ္တာေၾကာင့္ တကယ္ physical machine (OS platforms ကုိဆိုလိုပါတယ္) ေပါမွာမွီခုီမူမရိွေအာင္ ျပဳလုပ္ထားပါတယ္။ သူ့အတြက္ ကိုယ္ပိုင္ machine (JVM) ေလးတစ္ခုတည္ေဆာက္လိုက္ျပီး bytecodes ေတြကို execute လုပ္ေပးႏိုင္တာဘဲျဖစ္ပါတယ္။
Java ကို company တစ္ခုတည္းကေန တည္ထြင္ခဲ့ေပမဲ့ JVM ကို မတူညီတဲ့ organization  ေတြကေနျပီးေတာ့ တည္ထြင္ထားပါတယ္။ အဲ့ေတာ့ JVM type ေတြက အမ်ိဳးမ်ိဳးရွိပါတယ္။ Oracle က ထုတ္တဲ့ JVM ၊ IBM ကထုတ္တဲ့ JVM စသည္ျဖင့္ေပါ့။ Google ကထုတ္တဲ့ Dalvik VM ဆိုတာလည္း JVM အမ်ိဳးအစားတစ္ခုပါဘဲ။
Complie 

Java app တစ္ခုကို complie လုပ္ လိုက္တဲ့အခါမွာ class file ထြတ္လာပါတယ္။


ထြက္လာတဲ့ class file ကို class loader ကေနျပီးေတာ့ လိုအပ္တဲ့ lib files ေတြႏွင့္ခ်ိတ္ဆက္ေပးပါတယ္။ ျပီးရင္ bytecode ကို ေျပာင္းလဲေပးလိုက္ပါတယ္။ bytecode ဆိုတာက user language ႏွင့္ machine language ၾကားမွာရွိတဲ့ middle-language တစ္ခုလဲျဖစ္ပါတယ္။ JVM က ၀င္လာတဲ့ bytecode ကို emulate လုပ္ေပးပါတယ္။ တစ္နည္းေျပာရရင္ bytecode ဆိုတာ JVM နားလည္တဲ့ language ျဖစ္သြားပါျပီး။
Class Loader ထဲမွာ process သံုးခုျပဳလုပ္ေပးပါတယ္။ Load ၊ Link ၊ Initialize ဆိုတာပါဘဲ ။ Load အပိုင္းမွာေတာ့  User-Defined Class Loader / System Class Loader / Extension Class Loader / Bootstrap Class Loader တုိပါ၀င္ပါတယ္။

Class Loader က class တစ္ခုကို load လုပ္ေတာ့မယ္ဆိုရင္ အထက္ပါ အတိုင္း စစ္ေဆးျပိးလုပ္ေဆာင္ပါတယ္။ User-Defined Class Loader က user မွ direct ေရးသားထားတဲ့ code ေတြကို load ေခါေပးပါတယ္။ System Class loader ကေတာ့ CLASSPATH ထဲမွာရွိတဲ့ class ေတြကို load ေခါေပးပါတယ္။ Extension Class Loader ကေတာ့ လုိအပ္တဲ့ Java API ေတြကို load လုပ္ေပးပါတယ္။ ေနာက္ဆံုး bootstrap class loader မွာေတာ့ JVM က စတင္ run ေနပါျပီး။
အဲ့တာ class တစ္ခုစာ process တစ္ခုပါ။ အျခားေသာ class ေတြရွိေသးတဲ့အတြက္ link process ကို ဆက္လက္လုပ္ေဆာင္ပါတယ္။

Link process ျပီးလို့ initializing လုပ္ျပီးသြားရင္ class loader အပိုင္းက ျပီးဆံုးသြားပါျပီး။ Class Loader ကေနထြက္လာတဲ့ output က Runtime Data Area ထဲကို ေရာက္ရွိသြားပါတယ္။

Runtime Data Area

            Runtime Data Area ဆိုတာ JVM ကို OS ေပါမွာ  run ႏိုင္ရန္အတြက္ သတ္မွတ္ေပးထားေသာ memory area ေလးတစ္ခုဘဲျဖစ္ပါတယ္။ Runtime Data Area ကို အပိုင္း ၅ ပိုင္းခဲြလုိရပါတယ္။ အတိအက်ေျပာရင္ ၆ ပိုင္းခြဲလို့ရတာပါ။

PC Register တစ္ခုက thread တစ္ခုအတြက္ဘဲ create လုပ္ပါတယ္။ ေနာက္ထပ္ thread တစ္ခုသာဆိုရင္ ေနာက္ထပ္ PC Register တစ္ခုထပ္ျပီး create လုပ္ေပးရပါတယ္။ ထိုနည္းတူစြာ JVM stack ႏွင့္ Native Method Stack တို့ကလညး္ အတူတူပင္ျဖစ္ပါတယ္။
Heap ႏွင့္ Method Area အပါအ၀င္ Runtime Constant Pool တုိ့က တစ္ခါ create လုပ္ယံုပါဘဲ ။ thread ေတြဘယ္ေလာက္ရွိရွိ သူတို့ကို တစ္ၾကိမ္တည္းသာ create လုပ္ေပးရပါတယ္။
PC register ဆုိ Program counter register ျဖစ္ျပီး executed လုပ္ထားတဲ့ JVM ရဲ့ instruction ေတြရွိတဲ့ address ဘဲျဖစ္ပါတယ္။ next instruction ေတြကို ရည္ညြန္းတာဘဲျဖစ္ပါတယ္။
Thread တစ္ခုအတြက္ JVM stack တစ္ခု ျဖစ္တယ္။ အဲ့ေတာ့ stack ေတြအားလံုးကို stack Frame ေပါမွာတင္ထားပါတယ္။ JVM က လိုအပ္သလို stack ေတြကို stack frame ေပါ push/pull လုပ္ေဆာင္ပါတယ္။
Native method stack ဆိုတာကေတာ့ Java မဟုတ္တဲ့ native code ေတြထားရွိရန္အတြက္သံုးတဲ့ stack တစ္ခုဘဲျဖစ္ပါတယ္။ တစ္နည္းေျပာရရင္ native interface ကေနတစ္ဆင့္ link ခ်ိတ္ထားတဲ့ c code ေတြကိုထားရန္အတြက္ ျဖစ္ပါတယ္။ c stack ေပ့ါ။ (program ေပါမူတည္ျပီး stack name ေျပာင္းနီင္သည္)
Method Area ဆိုတာ လြယ္လြယ္ေျပာရရင္ class data (static variables, field and method information, method bytecode constant pool) ေတြ store လုပ္တဲ့ space တစ္ခုျဖစ္ပါတယ္။
Heap ဆိုတာက objects ေတြ ၊ instances ေတြကို store လုပ္တဲ့ space တစ္ခုျဖစ္တယ္။ အဓိကကေတာ့ garbage
Collection အတြက္သံုးျပဳပါတယ္။ JVM အမ်ိဳးအစားေတြက heap ကိုကိုင္တယ္ ပံုခ်င္း မတူ ႏွင့္ garbage collect လုပ္၊မလုပ္ ေပါမွာကြဲျပားသြားပါတယ္။ 

Tuesday, February 2, 2016

JavaFx Css Reference Guide

link

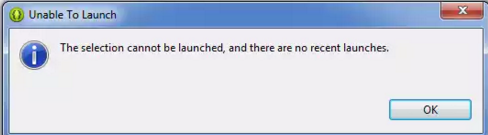
Eclipse can't launch JavaFx App

HelloWorldFx.java

import javafx.application.Application;
import javafx.stage.Stage;
public class HelloFx extends Application {
@Override
public void start(Stage stage) throws Exception {
stage.setTitle("First Hello World JavaFx");
stage.show();
}
}


This is because of you've not run anything before  (New Eclipse Configure)
This can be solved by adding main().

HelloWorldFx.java (Edited)
import javafx.application.Application;
import javafx.stage.Stage;
public class HelloFx extends Application {
public static void main(String[] args) {
Application.launch(args);
}
@Override
public void start(Stage stage) throws Exception {
stage.setTitle("First Hello World JavaFx");
stage.show();
}
}